Looking for a natural air freshener for your home? Check out this DIY air freshener, which you can have fun creating and customizing to your home decor and fragrance preference.
Instructions for a DIY Homemade Air Freshener
1. Gather your Materials
First, gather the materials you’ll need to make your DIY natural air freshener.
Here is the basic material list:
- Canning or Mason Jar
- Jar Lid Insert with Holes
- Jar Lid (Canning Jar Ring)
- Baking Soda
- Essential Oil(s)
We also offer a DIY Air Freshener kit, which includes all the items you’ll need to get started.
You can use any size canning or Mason jar. We prefer the small ones as they’re prettier and less conspicuous when placed around the house but really any jar will work.
![]()
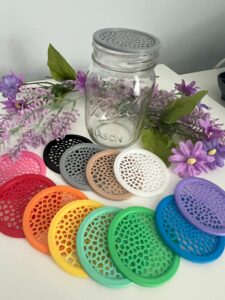
![]() Canning jars usually have a lid insert (the flat piece that covers the top of the jar) and a lid (the ring that twists on to keep the jar closed). Instead of a regular lid insert, you’ll want one with holes in it. We couldn’t find any available locally so we designed a pretty one we could 3D print in different colors. It’s available for purchase here on ab-creates.com. If you don’t want to purchase one you could use some aluminum foil and poke holes through it, or use a regular lid if you can find a way to poke holes in it. You will need the ring portion of the lid to keep the jar closed and from making a huge mess if it gets knocked over.
Canning jars usually have a lid insert (the flat piece that covers the top of the jar) and a lid (the ring that twists on to keep the jar closed). Instead of a regular lid insert, you’ll want one with holes in it. We couldn’t find any available locally so we designed a pretty one we could 3D print in different colors. It’s available for purchase here on ab-creates.com. If you don’t want to purchase one you could use some aluminum foil and poke holes through it, or use a regular lid if you can find a way to poke holes in it. You will need the ring portion of the lid to keep the jar closed and from making a huge mess if it gets knocked over.
You’ll need baking soda. This will act as the air freshener, to remove yucky odors from the area.
You can also use one or more essential oils to add a slight fragrance to the air. The fragrance(s) you choose are completely up to you – and totally optional!
2. Assemble the Air Freshener
This is a very easy DIY air freshener. To start creating the natural air freshener you just put baking soda in the jar and add a few drops of essential oils. We use a small canning jar, add about 1/4 cup of baking soda and start with about 3-4 drops of essential oil. This is a good starting place. You can then adjust the amount of oil based on your liking.
After adding the oil, stir the baking soda and oil with a fork or other utensil.
Place the mason jar lid insert with holes on the jar and close it up with the lid ring.
3. Decorate (Optional)
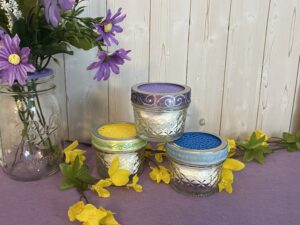
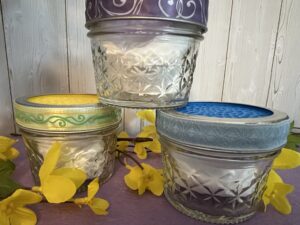
This step is optional, but can be fun. Decorate your new air freshener, as much or as little as you like! We chose to add ribbon around the jar lid. You could add a flower, star, or other embellishment to the lid. Some other ideas include painting the outside of the jar, adding a pretty label to the jar, or even put some flower stems through the holes of the lid. The possibilites are endless. We’d love to see what you come up with!
4. Place in Your Home
Now place the air freshener anywhere in your home that needs a little freshening up. These are small and you can make them match your decor so you can have one in every room. We have one in a closet, one in the entry way near the stinky shoes, one near the cat’s litter box, and one in the bathroom. We even keep one in the camper to keep it fresh when it’s not in use! Really they can go anywhere.
5. Adjust the Scent or Refill as Necessary
The best part about these air fresheners is how easy and inexpensive it is to keep refreshing them. No more buying expensive candles that leach who knows what chemical into your home’s air. If you’re not smelling the essential oil fragrance anymore, add a few drops. Is the musty or stinky shoe odor obvious again, add or replace the baking soda. Want a overall refresh? Dump the contents and add fresh baking soda and essential oils! These air fresheners are cheap, quick, and easy to refill!
We hope you had fun creating your own DIY Natural Air Freshener!